

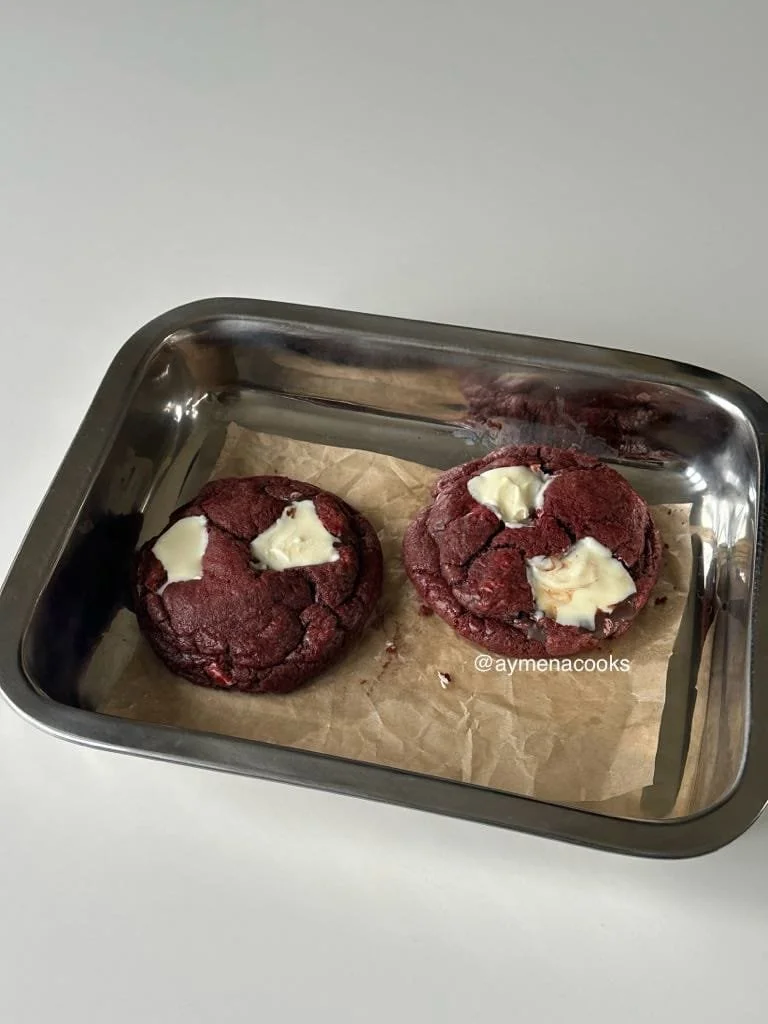
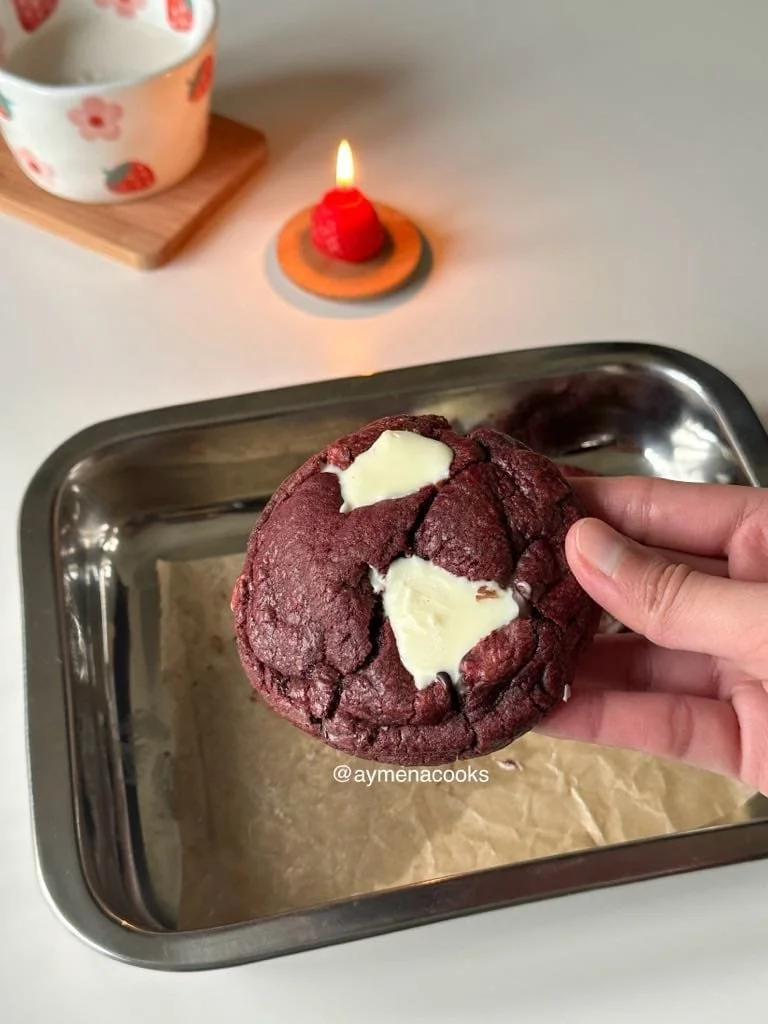
these red velvet cookies are everything you want in a bakery-style treat – thick, soft, chewy and generously studded with pools of white and dark chocolate.
why you will love these red velvet cookies
-
makes soft and thick red velvet cookies – these red velvet cookies have the most perfect crispy edges, a thick base, and soft, chewy middles. crispy but still soft and moist, and not cakey at all. basically my favourite kind of cookie!
-
great for holidays and gifting – these red velvet cookies look a bit more unique and special than your typical cookie, which makes them great for gifting during holidays and special occasions.
-
versatile and easy to customise – you can easily customise these red velvet cookies to match the occasion. load them with chocolate or pipe a cream cheese frosting on top or add sprinkles and crushed oreos or you can even press some chocolate hearts into them. it’s completely up to you!
learn how to make these red velvet cookies from scratch
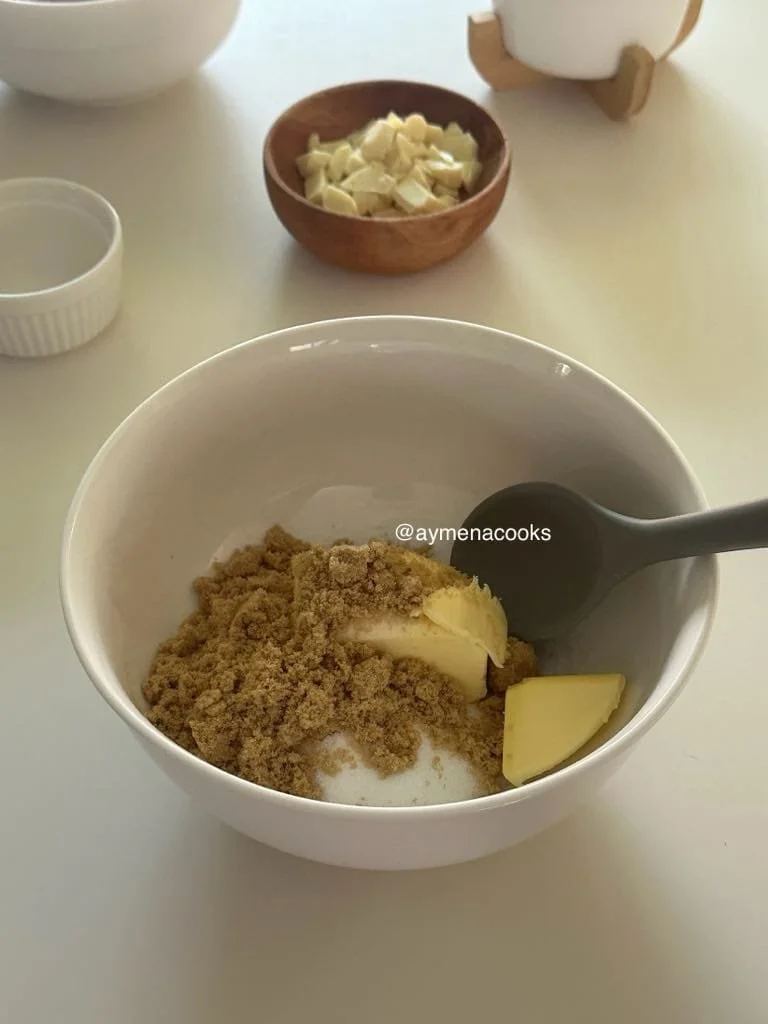
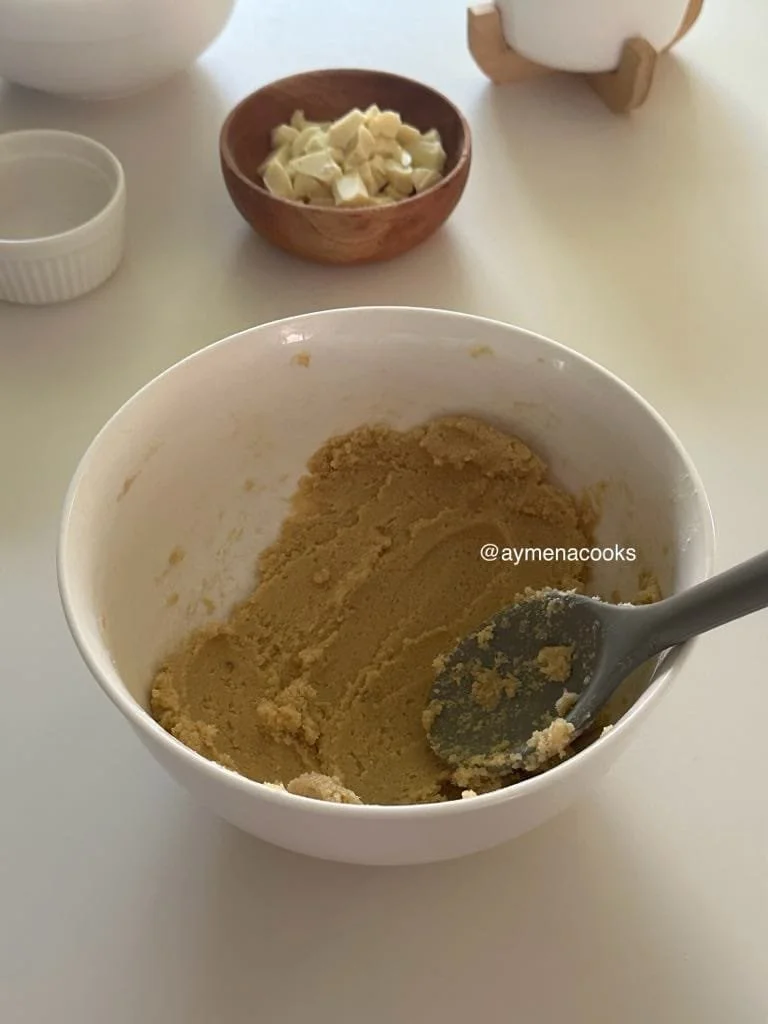
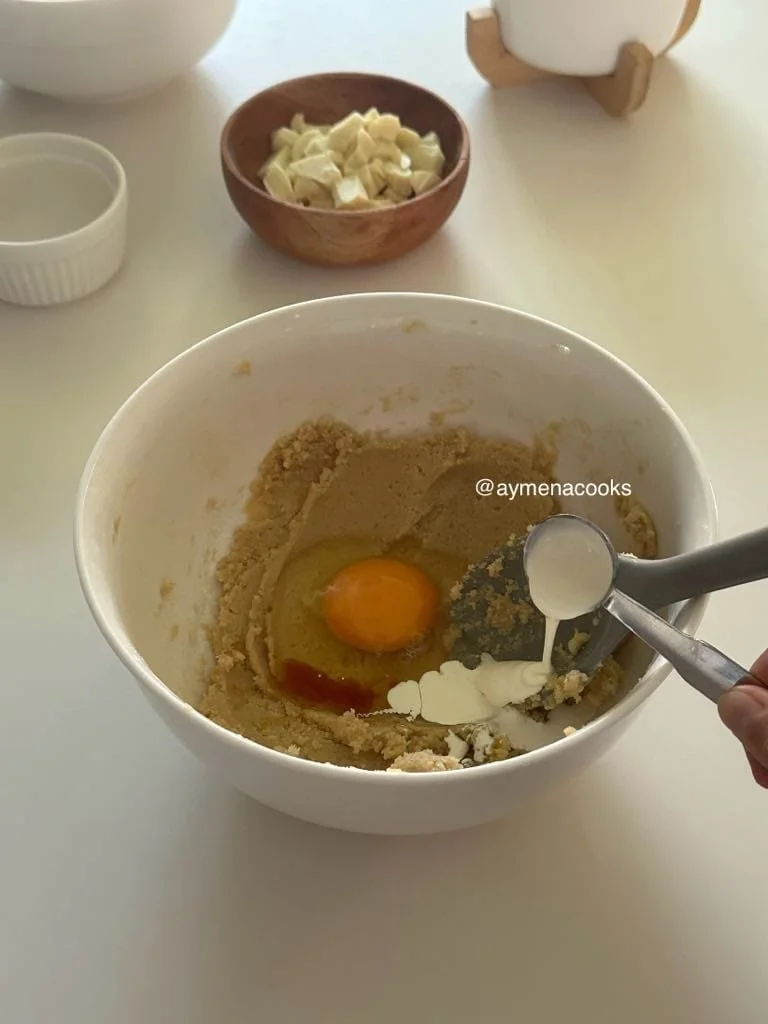
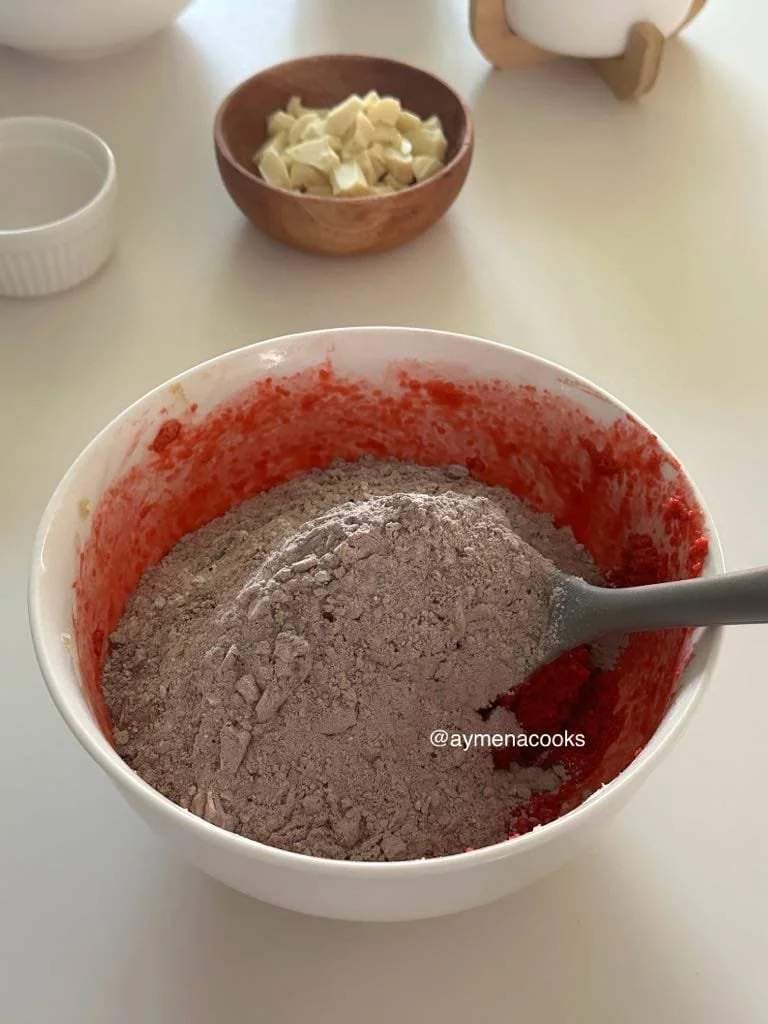
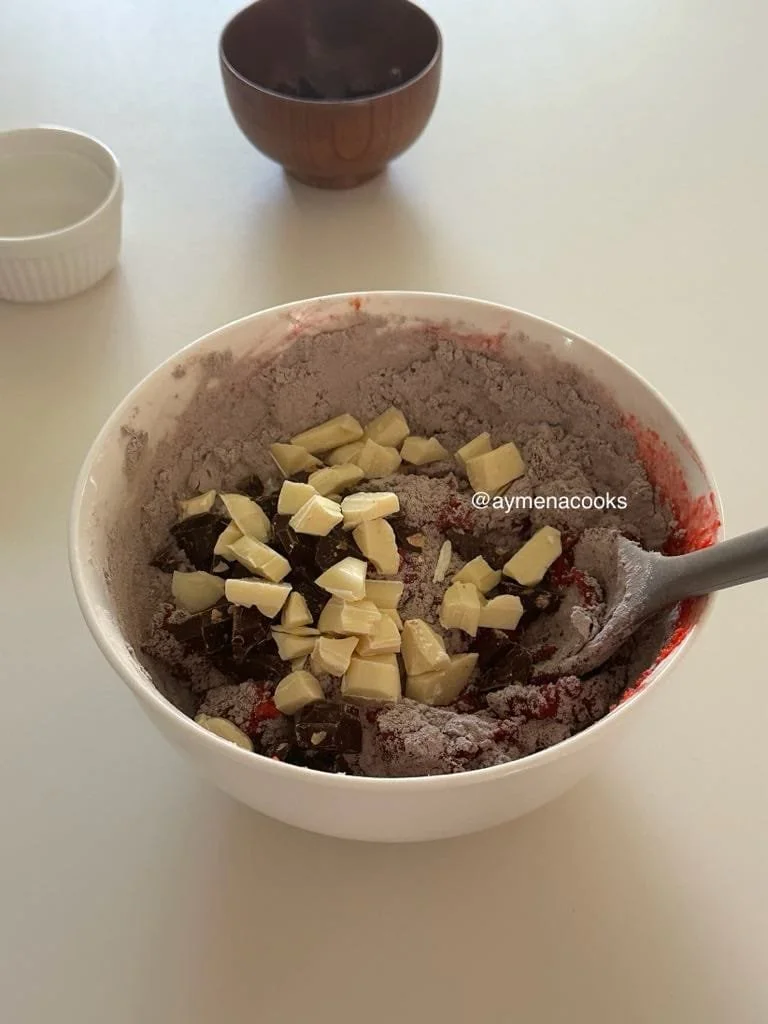
to make this red velvet cookies recipe from scratch, we’re going to start off by adding butter, granulated sugar and light brown sugar to a bowl, and mixing them together until combined. then, add an egg, some vanilla, a splash of white vinegar, a little bit of heavy cream and some red food colouring. mix everything until combined. in another bowl, mix flour, salt, cocoa powder, cornstarch, baking powder and baking soda, then add this to the rest of the mixture and fold it in until almost mixed in. then add the white chocolate chunks and dark chocolate chunks and mix them in until you get a red velvet cookie dough.
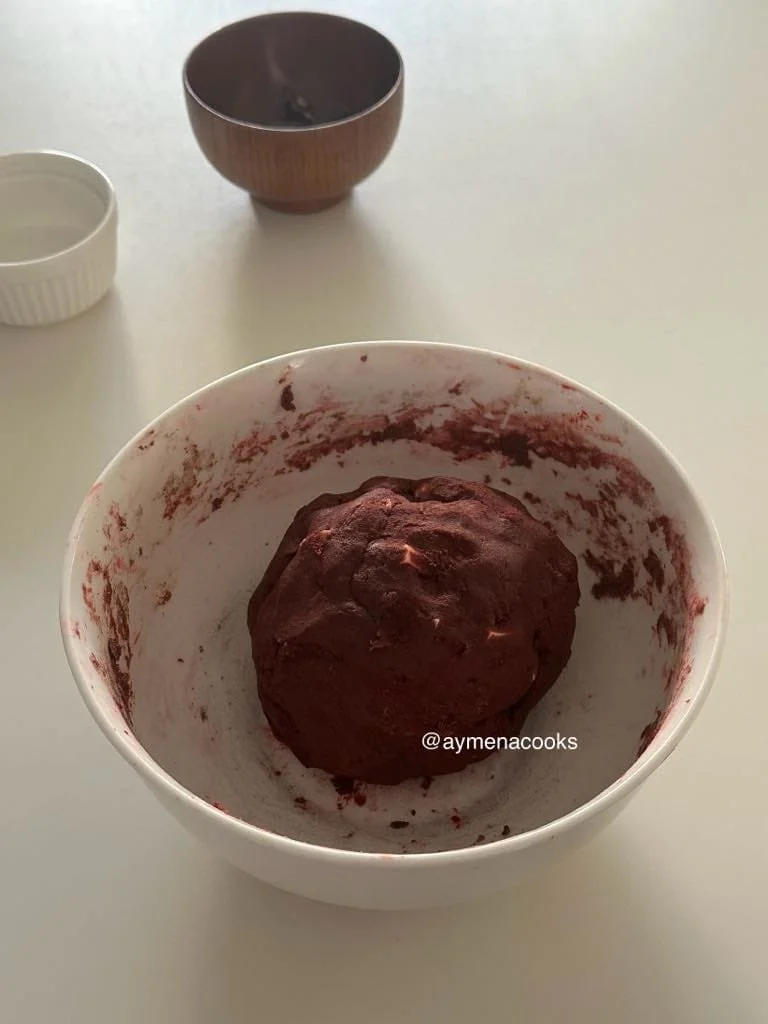
chill the red velvet cookie dough in the fridge, then split into equal-sized cookie dough balls. top each cookie dough ball with some extra chocolate, then bake the red velvet cookies until they’re set on the sides but still soft on the inside. let the cookies cool on the tray, and we’re done!
red velvet cookies ingredients
-
butter – i use unsalted butter in this red velvet cookies recipe. you are also welcome to use salted butter instead, but you might want to skip the extra salt stated in the recipe. we’re just going to be using room temperature butter for these red velvet cookies.
-
granulated sugar – this red velvet cookies recipe uses a mix of granulated sugar and light brown sugar. we’ll be creaming the sugars with the room temperature butter until combined.
-
brown sugar – to keep these red velvet cookies chewy and moist, i like to use a small amount of light brown soft sugar. you can use light brown sugar or dark brown sugar, bearing in mind that dark brown sugar will have a stronger molasses flavour and make your red velvet cookies darker in colour. if you don’t have brown sugar on hand, you can also just use all granulated sugar, as long as you’re okay with the red velvet cookies not being as soft and chewy.
-
eggs – this red velvet cookies recipe uses 1 large egg.
-
white vinegar – adding a small amount of vinegar to the red velvet cookie mix helps give these cookies that classic red velvet tang and also makes them extra soft and chewy.
-
vanilla extract – optional, but will add a nice, subtle vanilla flavour to your red velvet cookies.
-
red food colouring – i use a small amount of red food colouring paste to give these red velvet cookies their classic red colour. you can increase the amount if you want a stronger red colour. i used a red food colouring paste, and i would recommend using a paste or gel instead of liquid colouring. if using liquid food colouring, you might need to add more than stated in this recipe.
-
heavy cream – just a small amount of double cream or heavy cream will add some extra richness to these cookies and help make them really chewy.
-
flour – we’ll be using plain flour/all purpose flour for this recipe.
-
cornstarch – a small amount of cornstarch will help make these red velvet cookies tender and soft on the inside.
-
cocoa powder – i’m using natural, unsweetened cocoa powder for these red velvet brownies.
-
salt – just a small amount of salt will help balance out the sweetness in these red velvet cookies.
-
baking soda – i used a small amount of baking soda in these red velvet cookies to help them spread.
-
baking powder – some baking powder in this red velvet cookies recipe will help add thickness to the cookies.
-
white chocolate – i like making these red velvet cookies with white chocolate chips or white chocolate chunks.
-
dark chocolate – to balance out the sweetness, i also like to add dark chocolate chunks or dark chocolate chips to these cookies. you can also use milk chocolate if you’d prefer that over dark chocolate.
tools:
-
2 large bowls – you’ll need another large bowls for the wet ingredients and the dry ingredients.
-
silicone spatula or spoon – this will make it easier to gently fold the dry ingredients into the red velvet cookies mixture. we want to make sure not to over mix in order to keep these red velvet cookies gooey and soft, and using a spoon or spatula will make this easier.
-
parchment paper or baking paper – for lining your baking tray
-
baking sheet or tray – for baking the red velvet cookies
step by step instructions
for full measurements, keep scrolling down to the recipe below.
step one: in a large bowl, add room temperature butter, granulated sugar and light brown sugar.
step two: mix the butter and sugars together until combined and soft and creamy.
step three: add an egg, vanilla, some vinegar, the heavy cream and the red food colouring to the bowl. you can adjust the amount of food colouring depending on how red you want your cookies to be. mix all of this together until combined AND YOU GET A RELATIVELY SMOOTH BATTER.
step four: IN ANOTHER BOWL, ADD FLOUR, CORNSTARCH, SALT, COCOA POWDER, BAKING SODA AND BAKING POWDER. MIX ALL OF THESE TOGETHER.
step five: add THE DRY INGREDIENTS TO THE WET BATTER, AND GENTLY FOLD THEM UNTIL ABOUT HALF-MIXED IN.
step six: ADD THE WHITE CHOCOLATE AND THE DARK CHOCOLATE TO THE BOWL AND GENTLY MIX EVERYTHING IN WITH A SPOON OR YOUR HANDS UNTIL A RED VELVET COOKIE DOUGH IS FORMED.
step seven: CHILL THE RED VELVET COOKIE DOUGH IN THE FRIDGE FOR AT LEAST 30 MINUTES.
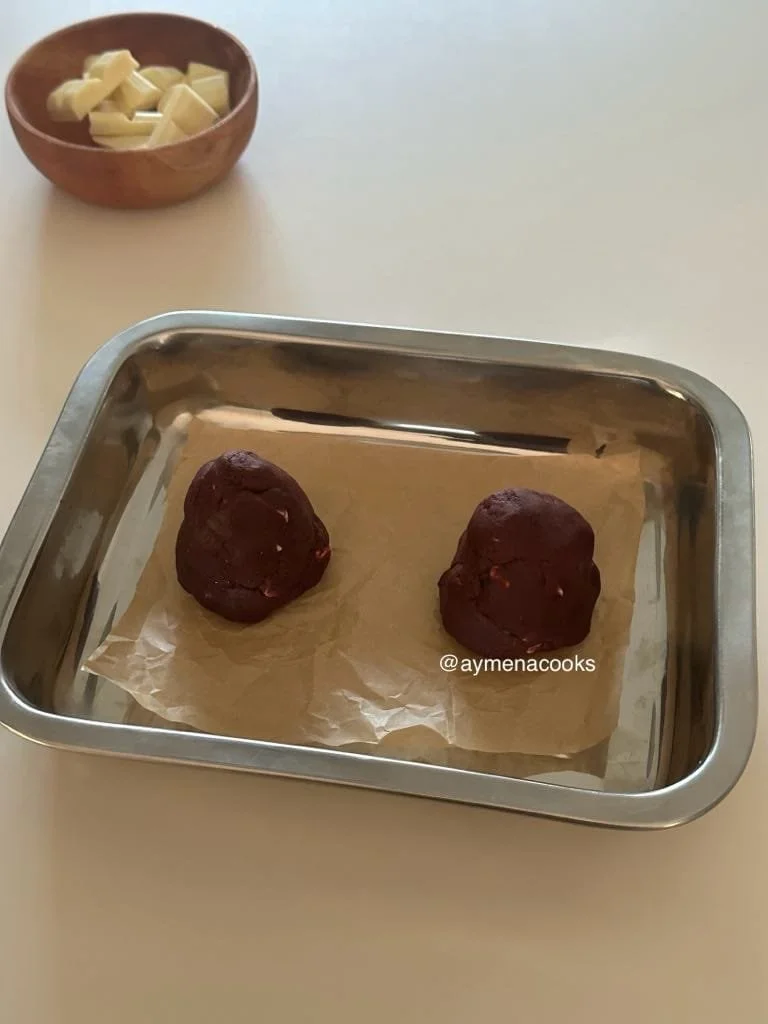
STEP EIGHT: SPLIT THE RED VELVET COOKIE DOUGH INTO EQUAL-SIZED PORTIONS AND SHAPE THEM INTO A SUBTLE CONE SHAPE, WITH A THICKER BASE AND A NARROWER TOP. THEN CHILL THE DOUGH IN THE FRIDGE FOR ANOTHER 30 MINUTES.
step nine: preheat oven 15-20 minutes before baking the cookies, and line a baking sheet with parchment paper or baking paper.
step ten: Then place the cookie dough balls on the lined tray, making sure to put space between them so that they have enough room to spread.
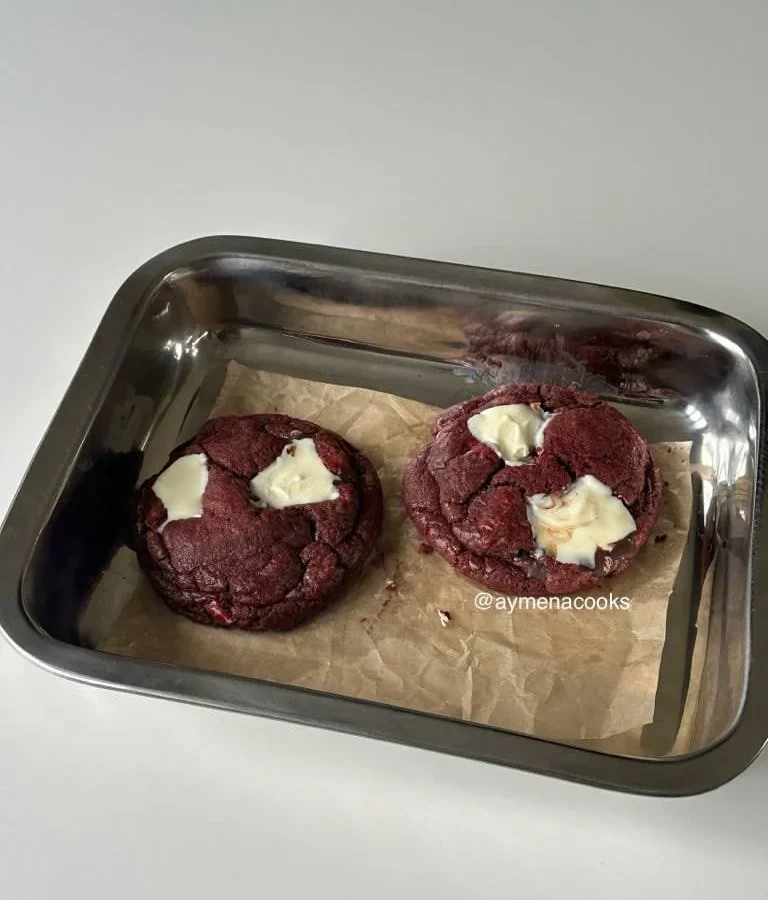
step eleven: bake the RED VELVET cookies for 13-15 minutes, or until they look THICK and SOFT, WITH SET EDGES.
STEP TWELVE: remove the RED VELVET cookies from the oven, THEN let them cool slightly on the baking sheet so that they can firm up a little. THEY WILL CONTINUE TO COOK AS THEY COOL.
STEP THIRTEEN: SERVE WITH A GLASS OF MILK, AND LET’S EAT!

tips and notes
-
i would recommend using room temperature butter and eggs when making these strawberry cheesecake cookies. this will just make it easier to mix the ingredients and help the ingredients incorporate better.
-
if you forgot to leave the butter out to let it soften, you can always put it in the microwave for about ten seconds, just so that it can soften slightly so that it’s easier to mix. make sure you don’t melt the butter completely or put it in the microwave for too long.
-
if using unsalted butter instead of salted, i would recommend skipping the extra salt stated in this recipe.
-
once you add the flour and dry ingredients to the cookie mixture, gently mix until just combined to avoid over mixing the dough. over mixing can make your cookies tough and less soft and chewy. you might need to use your hands to mix towards the end to help the dough come together.
-
i added white chocolate and dark chocolate chunks to these red velvet cookies, but you can switch this up depending on your preference. i like to use chopped up chocolate for those melty pools of chocolate, but you can also use chocolate chips if you like.
-
if you find the red velvet cookies too sweet, i would recommend increasing the salt instead of reducing the sugar as the amount of sugar has an impact on the texture of these red velvet cookies.
-
for the best colour, use gel or paste food colouring as you won’t need as much, and it won’t affect the texture of these red velvet cookies in the way adding liquid would. feel free to increase the amount of food colouring gradually depending on what kind of shade you’d like your red velvet cookies to have.
-
use a cookie scoop or weigh out the cookie dough balls so that all of the cookies are equal and consistent in size. this red velvet cookies recipe makes 6 big cookies, weighing 118g each. if you make them smaller than this, bear in mind that they might take less time to bake.
-
i actually shaped the cookie dough balls into a subtle cone shape for this recipe instead of a typical cookie dough ball. this helps give these red velvet cookies a thicker base when they spread out. it just makes for thick red velvet cookies with a softer, chewier middle.
-
press a few extra chocolate chunks on the top of each cookie before baking and after they’re out of the oven to make the red velvet cookies look a little nicer.
-
make sure you preheat the oven for about 15-20 minutes so that it’s already hot by the time you place your red velvet cookies in the oven. this will ensure that the red velvet cookies bake evenly and that they won’t take longer to bake. i find that when an oven isn’t hot enough, the cookies spread too quickly and don’t bake evenly. you can preheat the oven while the cookie dough balls are chilling in the fridge.
-
adjust baking time as needed. every oven is different, so i recommend keeping an eye on your red velvet cookies as they bake. i like to take them out of the oven when they’re slightly soft and underdone as they will continue to cook as they cool once they’re out of the oven. over baking might make your red velvet cookies dry and cakey and we definitely don’t want that! i baked these cookies for 15 minutes, but keep in mind that baking times will depend on how big your cookies are, so be sure to adjust times according to that. bigger cookies will take more time to bake.
-
once your red velvet cookies are out of the oven, they might look underdone and will be too soft to pick up. let them cool on the baking sheets for a good 10-15 minutes before trying to pick them up. they will continue to cook and set as they cool.
-
use a kitchen scale to measure your ingredients. while i add both metric and cup measurements for this recipe, i always recommend using a kitchen scale to weigh out your ingredients for most accurate results.
-
if using cups, bear in mind that the cup measurements written for this recipe are based on scooping the flour (as this is what most people tend to do), so they might seem higher than typical flour cup measurements.
-
storage instructions: store any leftover red velvet cookies in an airtight container at room temperature.
frequently asked questions
-
what do red velvet cookies taste like ?
– These red velvet cookies have a nice chocolate flavour with hints of vanilla and a subtle tanginess for that classic red velvet taste. They’re less intensely chocolatey than typical chocolate cookies, creating a more balanced taste.
-
my red velvet cookies aren’t red enough – what do i do ?
– if your red velvet cookies aren’t quite as red as you would like, just gradually increase the amount of gel or paste colouring in the batter until it reaches your desired shade of red. liquid colouring can affect the texture of your cookies, and isn’t as strong, so i would recommend sticking to gel or paste.
-
can i make this red velvet cookies recipe without food coloring ?
– yes, you can make these red velvet cookies without food coloring if you’re not too bothered about them being red. if you don’t use food coloring, they’ll just be more of a chocolate-brown colour.
-
can i use salted butter in this red velvet cookies recipe ?
– yes, you can use salted butter. if you use salted butter for your cookies instead of unsalted, i would recommend just skipping the extra salt stated in the recipe.
-
do i have to use vanilla extract to make these red velvet cookies ?
– the vanilla extract in this red velvet cookies recipe is optional. i like the subtle vanilla flavour it gives to the red velvet cookies, but if you would prefer not to use it or don’t have it, that’s also completely fine.
-
can i make these red velvet cookies without white chocolate ?
– yes, you can use whatever chocolate you like in these red velvet cookies. i like to use a mix of white chocolate and dark chocolate so that the sweetness is balanced but you can also use milk chocolate if you like or just one type of chocolate instead of two.
-
why did my red velvet cookies turn into a cake instead of soft and chewy ?
– the reason why your cookies turned cakey could be because of baking times. you should take your red velvet cookies out of the oven when they’re slightly underdone as they will continue to cook and firm up on the tray as they cool. even if you follow the exact timings in the recipe, every oven will bake things differently so timings will vary depending on your oven. i highly recommend checking on your cookies every once in a while, especially towards the end of the recommended times to make sure they don’t over bake.
– another reason could be that there was too much flour in your red velvet cookie dough. to make these red velvet cookies as accurately as possible, i would highly recommend weigh out the flour using a kitchen scale.
-
can i make these red velvet cookies without brown sugar ?
– the brown sugar in these red velvet cookies gives them some extra flavour and chewiness. however, if you don’t have brown sugar, you can substitute it with the same amount of granulated sugar. keep in mind that using all granulated sugar to make this cookie might result in a cookie that is less chewy and maybe even a little drier. it will also probably spread more, but other than that, it should work just fine. for best results, use a combination of light brown sugar and granulated sugar as stated. if you have molasses on hand, you could also add a small amount of that to granulated sugar to mimic the effect of brown sugar.
-
can i make these red velvet cookies without vinegar ?
– this red velvet cookies recipe uses vinegar to get that moist, chewy texture and also add a slight tang like in a classic red velvet cake. you can skip it if you like, but i would really recommend adding it.
-
can i make these red velvet cookies without heavy cream ?
– the use of heavy cream in this red velvet cookies recipe helps add a lovely chewiness and richness to the cookies. however, it is also completely fine to omit the heavy cream for the cookies if you don’t have it on hand or would rather not use it. you could also use buttermilk in place of the heavy cream and vinegar.
-
can i make these red velvet cookies without cornstarch ?
– i would highly recommend using cornstarch in these red velvet cookies as it helps make these red velvet cookies thicker and also give them soft, tender centres. however, if you don’t have cornstarch on hand, you can definitely make these red velvet cookies without it.
-
can i make these red velvet cookies with buttermilk ?
– Yes, you can. Buttermilk would work well and also helps add that classic red velvet tanginess. you can use this in place of the vinegar and heavy cream.
-
why did my red velvet cookies not spread ?
– one of the reasons why your cookies didn’t spread might be due to your oven temperatures being too low. make sure to preheat your oven 15-20 minutes before adding your cookies in so that the oven is hot enough.
-
do i have to chill the dough to make these red velvet cookies ?
-i would highly recommend chilling the red velvet cookie dough before baking it. letting it chill in the fridge will help enhance the flavours and prevent the cookies from spreading too much in the oven so that your red velvet cookies stay thick and soft. if you’re really pressed for time, or feeling impatient, try to chill the dough for at least 30 minutes. i would recommend chilling it for the full hour though.
-
can i make these red velvet cookies ahead of time ?
– to keep these red velvet cookies easy to make, you can definitely make the cookie dough ahead of time and then chill it in the fridge overnight. when you’re ready to bake the red velvet cookies, let the dough come to room temperature while the oven is preheating and then bake the cookies.
-
can i make these red velvet cookies from cake mix ?
– it’s definitely possible to make red velvet cookies out of cake mix, but i would highly recommend making them from scratch for the best flavour and texture. red velvet cookies made with cake mix tend to be more cakey rather than soft and chewy, but it’ll work in a pinch if you want to keep these red velvet cookies quick and easy.
-
can i make these red velvet cookie with cream cheese frosting ?
– absolutely! you can make a cream cheese frosting and then top your red velvet cookies with it once they’re cool. i love the cream cheese frosting used in these strawberry cheesecake cookies, and i think it would work so well with the red velvet cookies too!
-
what other red velvet cookies toppings would work well instead of a cream cheese frosting ?
– some other toppings that would work well with these red velvet cookies are a white chocolate drizzle or a milk/dark chocolate drizzle, some crushed oreos, a cream cheese or vanilla glaze or even a simple dusting of powdered sugar or icing sugar.
-
can i make red velvet cookies stuffed with cream cheese ?
– this red velvet cookies recipe is designed for regular cookies rather than red velvet cookies filled with cream cheese. i haven’t personally tried stuffing these red velvet cookies with cream cheese, but you’ll need a separate recipe for the cream cheese filling if you’d like to do this. make sure to portion out the cream cheese filling and freeze it before stuffing your red velvet cookies with it to make things easier.
-
can i freeze these red velvet cookies ?
– you can freeze the red velvet cookie dough balls and then bake them from frozen whenever needed. just make sure to add a few extra minutes onto the baking time if baking from frozen.
recipe
red velvet cookies
these red velvet cookies are everything you want in a bakery-style treat - thick, soft, chewy and generously studded with pools of white and dark chocolate.
- 15 minsprep
- 15 minscook
- 6servings
ingredients
16 ingredientsbrown sugar cookies
- 125g butter, unsalted, room temperature (1/2 cup + 1 tbsp)
- 75g light brown sugar (1/4 cup + 2 tbsps, packed)
- 75g granulated sugar (1/4 cup + 2 tbsps)
- 1 large egg, room temperature
- 1 tsp vanilla extract
- 1/2 tsp white vinegar
- 1/2 tsp red paste or gel food colouring
- 10ml double cream or heavy cream (2 tsps)
- 230g plain flour or all purpose flour (1 cup + 1/4 cup + 3 tbsps)
- 15g natural unsweetened cocoa powder (2 tbsps)
- 3g cornflour or cornstarch (1 tsp)
- 1/4 tsp to 1/2 tsp salt (depending on your preference)
- 1/2 tsp baking powder
- 1/2 tsp baking soda
- 80g dark chocolate chips or chopped chocolate (1/4 cup + 3 tbsps)
- 80g white chocolate chips or chopped chocolate (1/4 cup + 3 tbsps)
method
12 steps- in a large mixing bowl, add room temperature butter, light brown sugar and granulated sugar. mix the butter and sugar together using a mixer or a spoon until completely combined and the mixture looks thick and creamy.
- add the egg, heavy cream, white vinegar, vanilla and red food colouring, and mix this in until completely combined. you should have a relatively smooth batter.
- in another bowl, mix together flour, cocoa powder, cornstarch, salt, baking soda and baking powder. add the dry ingredients to the wet batter. use a spoon or silicone spatula to gently fold the dry ingredients into the wet batter until about half-mixed in.
- add the white chocolate chunks and dark chocolate chunks to the bowl. gently mix everything in with a spoon or your hands until a red velvet cookie dough is formed.
- once a dough is formed, place the bowl in the fridge, and let the cookie dough chill for about 30 minutes.
- split the red velvet cookie dough into equal-sized portions (i weighed each one out to be 118g or about 4oz each). shape each portion of cookie dough into a subtle cone shape, with a thicker base and a narrower top. then chill the dough again for another 30 minutes.
- preheat oven to 180 °C (350°F) 15-20 minutes before baking, and line a baking sheet with parchment paper or baking paper.
- once your cookies are ready to bake, remove from the fridge and place the dough balls on your baking sheet, making sure to put space between them so that they have enough room to spread.
- press a few more chocolate chunks on the top of each cookie dough ball before baking.
- bake the cookies at 180°C (350°F) for 13-15 minutes, depending on their size. they should look thick and soft, with set edges.
- remove the cookies from the oven when they're still slightly underdone, and let them cool on the baking sheet for a while so that they can firm up a little. they will continue to cook as they cool.
- serve with a glass of milk, and let's eat!
comments
Questions, tips, and kind notes are welcome.